“Besides black art, there is only automation and mechanization.” Federico Garcia Lorca
Introduction
How can you use Salesforce Platform as a business process automation engine?
The following illustration shows the different process automation tools available in the Salesforce Platform. These automation tools can be used to configure Salesforce Platform as a true “Smart Process App”. In addition, Integration-as-a-Service tools provide connection to external systems, allowing Salesforce Platform to act as the technology backbone for overall Business Process Management.
Demystifying the Nomenclature
•Visual Workflow (aka Cloud Flow Designer): This is the name of the tool, which functions as a powerful rules engine.
•Flow: The processes you design using Visual Workflow tool are called flows.
•Headless Flow (aka Autolaunched Flow): An autolaunched flow is one which can be launched from the Process Builder without needing any user interaction.
•Login Flow: This is a special kind of flow, which can be used to customize user login process, e.g. when a user tries to login, present her with a “Terms of Agreement” document to accept.
•Process Builder is the tool in Salesforce, which is designed as the modern replacement of the older Workflow tool. The older workflow tool continues to exist in your Salesforce Org.
•Apex is the Salesforce programming language. Using Apex, you can create “classes” or “triggers”.
oInvocable Apex: Just as you can launch flow from the Process Builder, you can launch an Apex program from the Process Builder. In order to allow an Apex method to be executed as a Process Builder action, you need to use the @InvocableMethod annotation.
o@future & future method: The apex program you trigger from the Process Builder can make an API call to external systems. For this you need to use a future method in your apex class in addition to the @ InvocableMethod notation and @future notation.
•Apex Triggers – Apex triggers can be used to perform custom actions before or after an event in the Salesforce Platform. As an example, after an account is inserted in Salesforce, you can create an Apex Trigger to fire when an account is inserted in Salesforce. This Apex Trigger in turn can call a class which can call an external API to insert records in another external system.
A Few More Terms
•Approvals: You can create approval processes and launch them from the Process Builder. As an example – if the value of the discount offered is greater than 40% then submit it for approval to the user’s manager.
•Workflow – Workflow is the name of the older rules engine in Salesforce – it continues to exist as many customers still run the processes they designed with this tool.
•Flow triggers – In the older workflow tool, it was possible to define an action which would launch a flow behind the scenes just as autolaunched flows can be launched today with Process Builder. Such flows, which could be launched from the older workflow tool, were called Trigger Ready Flows.
When To Use Which Tool?
Process Builder vs Visual Workflow
•The Process Builder tool is designed as an easy to use tool to accomplish most of your automation needs. This should be your first choice.
•For complex needs, as in our example, combine the Visual Workflow tool with the Process Builder.
•For those rare occasions when the GUI automation tools do not suffice, use Invocable Apex classes in conjunction with Process Builder/Flows.
Apex Triggers vs Process Builder/Flows
The combination of Apex Triggers & Classes can help meet your automation goals when everything else is impossible. As an example, it’s not possible using the Process Builder to define the order in which processes for the same object will execute – however with Apex Triggers you can control the order in which processing will take place (caution – for this you need to use one trigger per object pattern).
Using Apex Triggers requires coding and creating test classes before you deploy. So first see if you can accomplish the task at hand with Process Builder/Flow before starting to write triggers.
In-depth Comparisons of the Different Process Automation Tools
•Process Automation Trailhead (Hands-on tutorial): Which Tool to Use? https://developer.salesforce.com/trailhead/en/business_process_automation/process_whichtool
•Visual Workflow Implementation Guide: https://developer.salesforce.com/docs/atlas.en-us.salesforce_vpm_guide.meta/salesforce_vpm_guide/process_which_tool.htm
Remember: The three elements of Salesforce Platform – Process Builder, Visual Workflow & Apex – can be used in combination with each other to automate & simplify your business processes.
Case Study
Let us consider a short case study. In this example, we will use the power of Flow to extend the Process created with Process Builder for automating our business process.
Requirement: “When a case is created in Salesforce, automatically add a specific account team member to the case team based upon the account team role”.
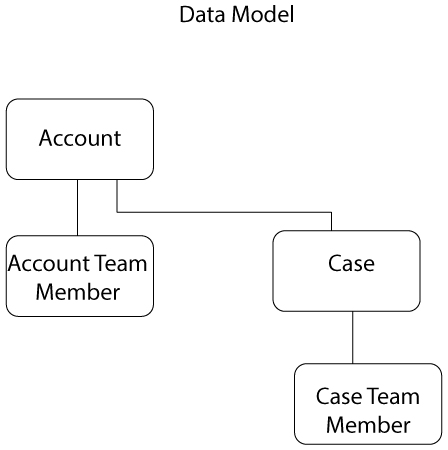
In our example there are 4 Salesforce objects we shall interact with –
• Account
• Account Team (child of Account)
• Case
• Case Team (child of Case)
In your Process Builder and Visual Workflow, you will need to specify the API names for the objects. Sometimes the API names for standard objects and fields are not intuitive. I always use the SOAP API guide as it contains descriptions of the object names, fields and the datatype (e.g. String, Number etc.) of the fields. As an example, the SOAP API Guide provides a description of the fields in the Case Team Member object: https://developer.salesforce.com/docs/atlas.en-us.api.meta/api/sforce_api_objects_caseteammember.htm
Pre-work:
You need to explicitly enable Account Team and Case Team in your Salesforce Org as they are not enabled by default. Following are the links to help you:
•Setup Case Teams: https://help.salesforce.com/HTViewHelpDoc?id=caseteam_def.htm&language=en_US
•Setup Account Teams: https://help.salesforce.com/apex/HTViewHelpDoc?id=customize_accountteams.htm&language=en_US
•Insert a few records in the account team.
•Create Case Team role – Name one of the roles to be “Case Team Role 1”.
Summary of Steps
We shall use the Process Builder in combination with the powerful Visual Workflow to accomplish our automation objective as follows:
Process Builder
•Create process which gets triggered whenever a new case is created.
•Pass the record ID of the parent Account, and of the Case, to the Visual Workflow.
VisualWorkflow
•Using the Account’s record ID, retrieve the values of the records in the Account Team, which is in the Account’s related list.
•Loop through the Account Team records to filter only those records which have the field Account Team role set to a specific value.
•Retrieve the record ID of the user who is listed as the Account Team member in the above the records (i.e. records with a specific value of account team role).
•Insert this account team member as a member of the case team for the case record whose Record ID you had got from Process Builder.
•Since the Case Team Role for any new Case team member being inserted is a required field, you can insert a predefined constant in this field in the above record.
Detailed Step by Step Guide
The first step in creating our automation project is to create the Flow. Then we will create the Process Builder process described above. This is because the Flow is being called from the Process Builder and thus the Flow must already exist (with a specific kind of variables) for it to be referenced in the Process Builder.
Let’s create the Flow!
The first step in creating the Flow is to identify and create the variables and constants you will need.
Create Flow & Define Input Variables
Process Builder will pass in variables to the Flow for Account ID and Case ID (i.e. the record IDs of the account and contact). You will create these variables, and variables needed to pass data between elements in your Flow, in the Resources tab. After you create them, you can view and edit them in the Explorer tab.
Click New Flow and select the Resources tab.

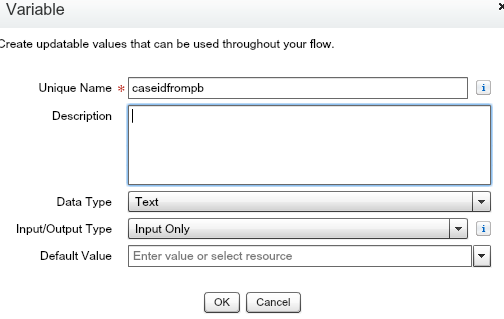
In the Resources tab, double-click Variable and fill in the information for the Account ID variable. Do it again for the Case ID variable. Remember to set the Input/Output Type to Input Only. This will expose the variable in the Process Builder.

Define Other Variables
Within the Flow you need variables to pass data between the elements. You’ll use SObject Variables and SObject Collection Variables because they automatically know the fields in the object you select and will change if you add or remove fields.
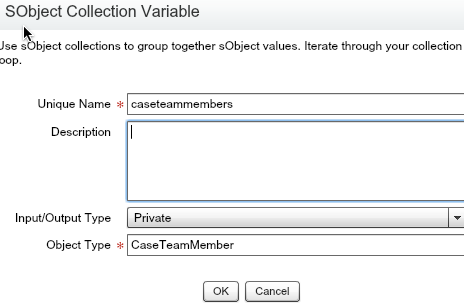
Double-click SObject Collection Variable and fill in the information for the Account Team collection variable. This is where you will store the Account Team records retrieved from the Account Team Member object. Input/Output type should be Private.

Double-click SObject Variable (not SObject Collection Variable, because for this part we only need to store a single record) and fill in the information for the Account Team single record variable. This is used as temporary storage when looping through the Account Team Member collection variable. Input/Output type should be Private.

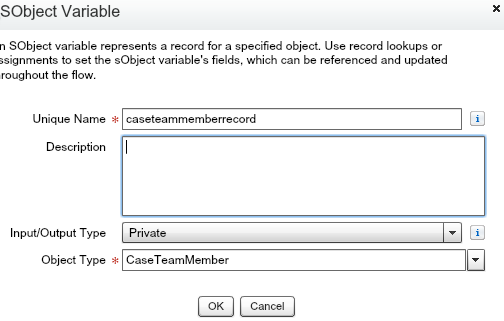
Double-click SObject Variable and fill in the information for a Case Team single record variable. This is used as temporary storage when assigning values for the new Case Team Members. Input/Output type should be Private.
Double-click SObject Collection Variable (you need this to hold the Case Team Member records you want to create) and fill in the information for the Case Team Member collection variable. This is used to create new Case Team Member records in the Fast Create step. Input/Output type should be Private.
Double click Constant in the Resources section and assign it the record Id of one of the Case Team roles you had created in the Pre-work section. For simplicity in our Flow, each Case Team Member record we will create will have this default role assigned to him or her. Obviously you can change the logic later in your own flow to assign the roles based on some criteria.

We are now ready to add Flow elements that will use these varaibles. But first, select the Explorer tab and check your work. You should have six variables (two of each type) & one constant. You can check their properties by single-clicking on them, and edit by double-clicking.

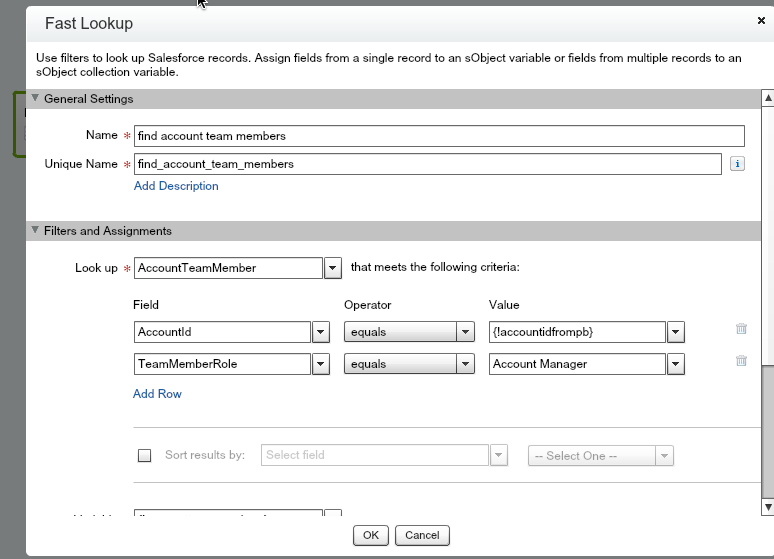
Define Fast Lookup
With the Account ID variable passed in from the Process Builder process, you can select all of Account Team Members for that Account with a Fast Lookup on the Account Team Member object.
Select the Palette tab. Drag the Fast Lookup element onto the canvas. In General Settings, set the Name to “find account team members” – the unique name will automatically default to “find_account_team_members”. Then fill in the Filters and Assignments information.
Define Loop and Assignments
Now you need to iterate through the AccountTeamMembers collection to map the values to the CaseTeamMembers collection.
From the Pallete tab, drag the Loop element onto the canvas. Fill in the following  information.
Now, from the Pallete tab, drag the Assignment element onto the canvas. This is where you populate the CaseTeamMemberRecord variable using the AccountTeamMember’s userid ID value from the AccountTeamMemberRecord variable and the Case ID you passed from the Process Builder process.
You also map your constant (CaseTeamRoleId) to the TeamRoleId field of the CaseTeamMember object.
Note that in the above you have to map the record id of the user field in the account team to the record of the member field in the case team.
Fill in the information, setting these assignments:
{!caseteammemberrecord.MemberId} = {!accountteammemberrecord.UserId}
{!caseteammemberrecord.ParentId} = {!caseidfrompb}
{!caseteammemberrecord.TeamRoleId} = {!CaseTeamRoleId}

So in this assignment you complete the “mapping”.
Now you will again use the assignment element – this time to do the actual adding.
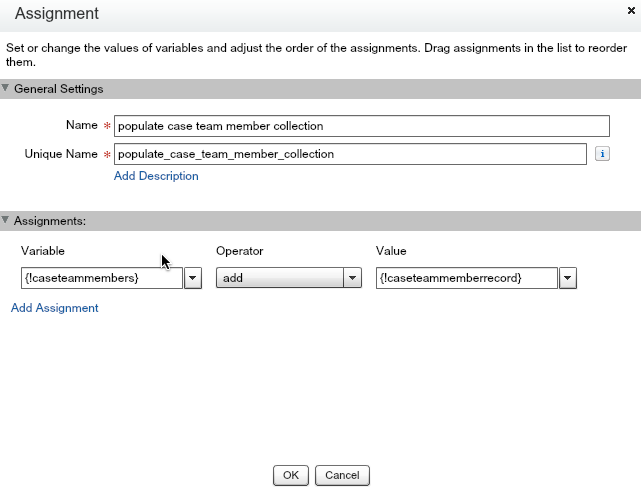
Now you need to add that record in the above assignment to the CaseTeamMembers collection. From the Pallete tab, drag the Assignment element onto the canvas.
Fill in the information, setting this assignment:
{!caseteammembers} add {!caseteammemberrecord}
Define Fast Create
Now you have done the mapping & the adding which filled up the collection CaseTeamMembers with the desired values. Now you have what you need to actually create the new Case Team Member records for the potential Case Team Members! Just provide the Fast Create element with the SObject Collection variable you’ve populated.
Select the Palette tab. Drag the Fast Create element onto the canvas. Fill in the information.

Since the CaseTeamMembers collection variable is of “type” CaseTeamMember object, the Fast Create element knows that it needs to put the values in that collection to the CaseTeamMember object.
Tell the Flow Engine What to Do
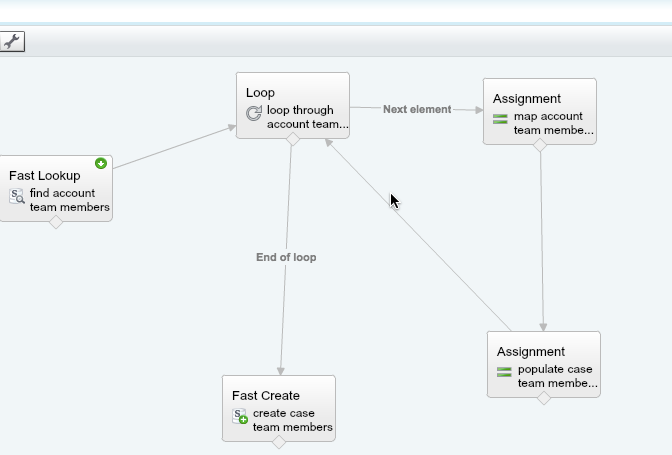
Right now your four Flow elements are disconnected and the Flow engine doesn’t know where to start. To connect any two elements, click the diamond at the bottom of an element and drag to another element to draw a connector line.
Connect these elements, in this order:
• Fast Lookup to Loop
• Loop to Assignment #1 (set the Loop Routing to Go to this element ‘for each value in the collection’)
• Assignment #1 to Assignment #2
• Assignment #2 to Loop (to close the loop)
• Loop and Fast Create
Hover over the Fast Loopkup element and click the little green arrow that appears. That marks the Fast Lookup as the starting element.
You should now have a Flow that looks like this…
Save and Activate
Finally, you need to save the Flow and then Activate it before you can test.
Click Save and fill in the Flow Properties. Make sure you set the Type to ‘Autolaunched Flow’. This makes it available in the Process Builder.

Click Close. Now you should be on the Flow Detail page. Your Flow is listed in the Flow Versions list. Click the Activate link.

Create a Process in the Process Builder
Now we are going to create the process and add our flow to the process.
Let’s fire up the Process Builder and create this process.
Click New and populate the details of your new process.
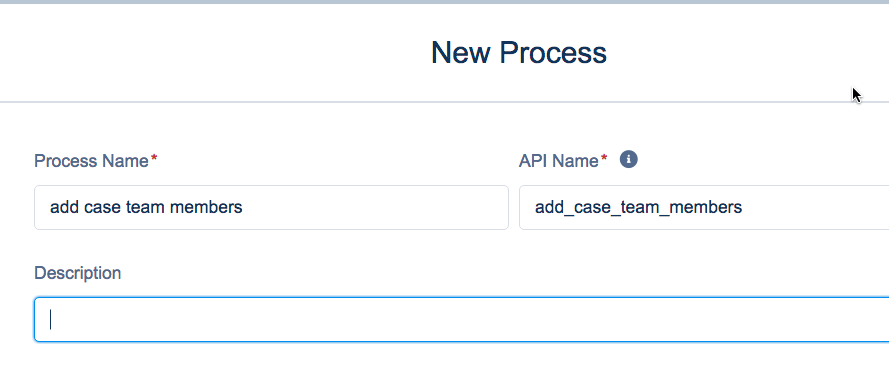
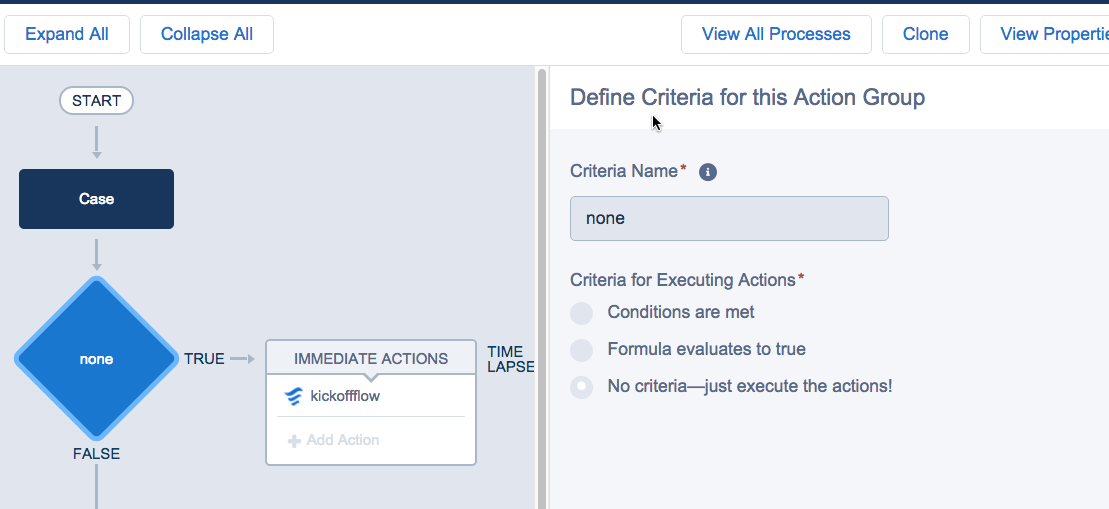
Select the Case object – select that the process should be triggered whenever a new case is created.

For simplicity we do not choose any criteria.
Add the Flow to your Process
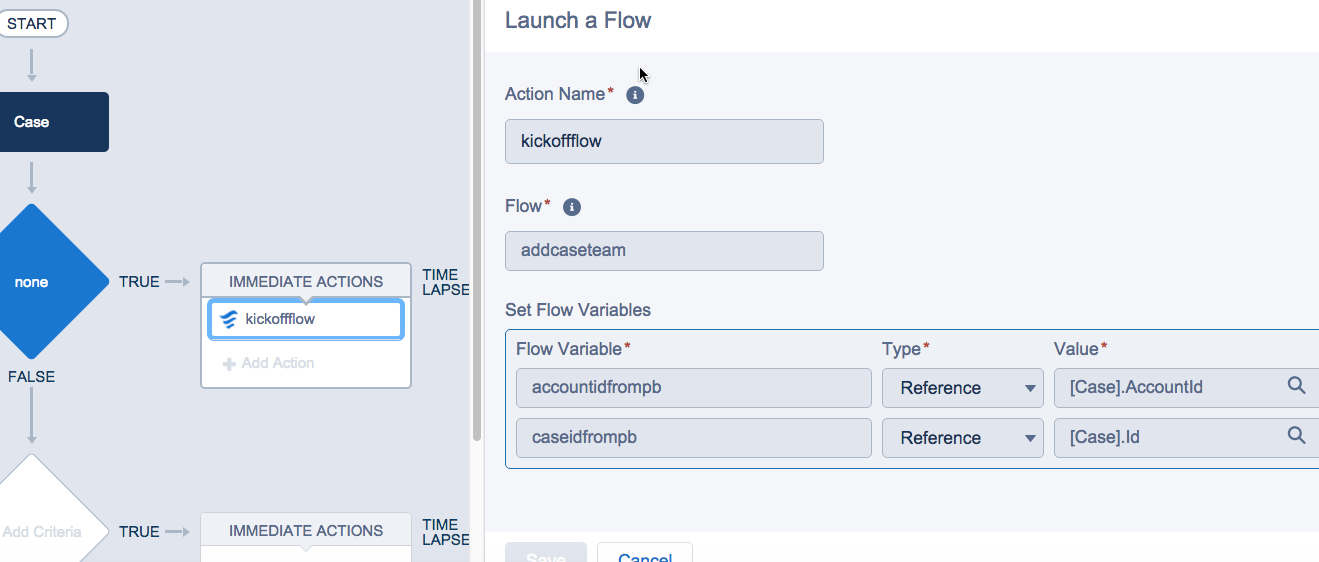
We want the potential Account Team Members added as Case Team Members for all new Cases (if they have a certain Account Team Member Role). Calling a Flow from a process in Process Builder gives us the extra strength we need for this automation, while keeping it in one place to make it easy to maintain and to share with our team.
Now you can add an action that calls your brand new Flow, and provide values for the two input variables you defined in the Flow.
Save & Activate
Save & then activate your process.
Test
Your functioning process should now be ready to test. Create a new case, you should automatically see a Case Team Member assigned to the case. This member should be a user who has a specific role in Account Team he is a part of.
Additional Notes on Automation Tools
In addition to the scenario we discussed above, you can use each of the three Process Automation tools – Process Builder, Visual Workflow & Apex – on its own. Here are some examples:
• Use Process Builder to create a post in a specific Chatter Group if the Case belongs to a specific set of accounts (say, for important customers).
• Use Visual Workflow to create a flow which functions as a shipping cost estimator. As an example in a pop-up screen, ask the user for the shipping city, and based on that calculate the shipping cost. You can put in the flow url in a custom button or URL.
• Use Visual Workflow to create a Login Flow, say which pops up a Terms of Agreement when a user signs in. You can utilize the sample Login Flows provided in this page (look at the bottom of the page): https://developer.salesforce.com/page/Login-Flows
Considerations
•You cannot launch a flow with a screen element from the Process Builder.
•The flow is the logic you create using the Visual Workflow. However in the debug log why do you see “Flow Errors” even for Process Builder issues? This is because the Process Builder uses the Visual Workflow’s rules engine behind the scenes.
•You must create the Flow first (with the variables of type Input) before they can be referenced in the Process Builder.
•As a thumb rule “Fast” elements (e.g. Fast Create) should be your first choice. The Flow implementation guide can help you understand when to use which elements and variables in your Flow.
•Try saving your Flow if you don’t immediately see your objects in the drop down. Refresh and try again.
•Processes cannot be modified once they have been activated. To modify a process, Clone it first. Save the clone as a version of the current process (this is the default).
Resources
Process Builder
Process Automation Hands-on Tutorial: https://developer.salesforce.com/trailhead/en/module/business_process_automation
Visual Workflow (Flow) – Cloud Flow Designer
Visual Flow Implementation Guide: This is great since it helps you choose which kind of variables and other objects you should put in your Flow. https://developer.salesforce.com/docs/atlas.en-us.salesforce_vpm_guide.meta/salesforce_vpm_guide/vpm_intro.htm
The Power of Flow: Advanced Workflow Techniques: https://developer.salesforce.com/events/webinars/power_of_flow
Cloud Flow Designer Workbook: https://resources.docs.salesforce.com/sfdc/pdf/workbook_flow.pdf
Apex
Calling Apex from Flows & Process Builder: (Invocable Apex notation) http://releasenotes.docs.salesforce.com/en-us/spring15/release-notes/rn_forcecom_flow_apex.htm
Passing Data to Flow from Apex Program: https://developer.salesforce.com/docs/atlas.en-us.apexcode.meta/apexcode/apex_process_plugin_using.htm
What are Apex Triggers (Hands-on Trailhead): https://developer.salesforce.com/trailhead/en/apex_triggers/apex_triggers_intro
Bringing it Together: Process Builder, Flow & Apex Working Together
Stop Changing the Trigger Criteria! Using Processes, Flows, and Apex Together: https://www.youtube.com/watch?v=qFfBmKD-J90
TrailHead DX Tutorial: Process Builder, Flow & Invocable Apex: https://github.com/developerforce/sforceProcessTDX/blob/master/processTDX.md
1,976 total views, 4 today