LLM AI Agent Summary
What exactly is an autonomous Agent? An LLM-powered autonomous AI agent is a software program that can understand what we type, think through what to do next, and reply like a human. It uses advanced language technology (LLMs) to help us solve problems or complete tasks — like chatting, finding information, or connecting to other apps — all on its own. It’s like having our own digital assistant.
What’s involved in creating a LLM based autonomous AI application from scratch? To understand the steps involved in building an LLM powered agent, I created an intelligent agent using Python and deployed it on Heroku. This agent leverages advanced language models to provide context-aware responses in real time.
This autonomous agent allows users to ask questions and receive answers that are personalized and informed, with the system dynamically maintaining the context of the conversation.
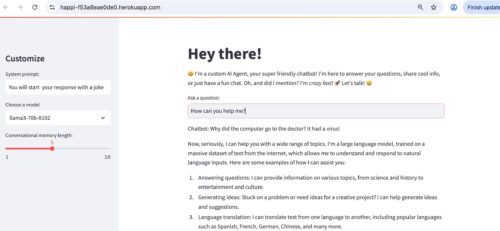
It’s very similar to ChatGPT, except that I have used another LLM (LLAMA3) to power it (instead of OpenAI) and wired up everything with open source libraries.
I have tested this agent to make web searches (e.g., results from Wikipedia). It can also be extended to use RAG, web-scraping and other cool things. I used python since it has so many libraries to support AI work.
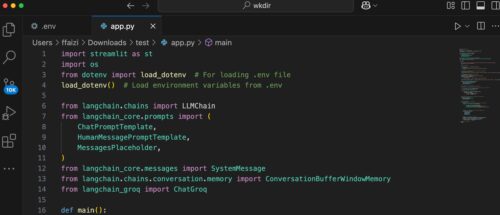
I am using Python 3.11 and VS Code for editing. I considered using other dev environments (e.g., Jupyter Notebook) but I found VS Code to be the simplest for my purpose. I use GitHub for my VCS – and Heroku for my deployment platform.
My goal is to use this autonomous agent in a multi-agent application with Salesforce Agentforce, so this is the first in a series of posts.
The Inner Workings of the Autonomous AI Agent’s Decision-Making Logic
Environment and Library Setup
I use a .env file to store the API key so as not to expose it in the application. The script starts by importing essential libraries including Streamlit, OS utilities, and dotenv for environment variable management.
Environment variables are loaded so that the Groq API key is available for authentication.
Initialization and Configuration
I tested several agent UI libraries and I also considered building the UI completely from scratch with JS, HTML, CSS. Eventually I decided on Streamlit library for this application simply because it involved the smallest amount of code. I will test with other UI libraries such as Flask for other applications.
The application sets up a title and greeting message using Streamlit’s UI functions.
In the sidebar is included the ability to customize settings such as the system prompt, model selection, and the conversational memory length.
A ConversationBufferWindowMemory object is created based on the slider value to retain a specified number of previous messages.
Session Management
The script uses Streamlit’s session_state to persist the chat history across user interactions.
If there is an existing chat history, it is loaded into the memory buffer for continuity.
Chatbot and Conversation Chain Setup
A ChatGroq object is instantiated with the Groq API key and the selected model from the sidebar.
A ChatPromptTemplate is constructed using three components:
(1) A system prompt (customizable via the sidebar)
(2) A placeholder for the chat history
(3) A template for the human message
The LLMChain is then created with the Groq-backed LLM, the prompt, verbosity enabled (I disabled this in the actual implementation), and the memory buffer.
Processing User Input
When a user enters a question in the main input field, the script processes the input by invoking the conversation chain’s predict method.
The generated response is appended to the session state chat history and then displayed on the Streamlit UI.
Open-Source Python Libraries Used in the Autonomous AI Agent Project
For my work here, I tested many different frameworks and finally settled on the following libraries.
Streamlit
Streamlit is a framework for quickly building interactive web applications in Python. In this design, it creates the user interface for Happi, allowing users to input questions, adjust settings, and view responses. It also manages session state to ensure that previous interactions are maintained and used to inform ongoing conversation context.
dotenv and os
The dotenv library loads environment variables from a .env file, a secure method for storing sensitive configuration such as API keys. The os library accesses these variables at runtime. In this application, they work together to supply the Groq API key needed for the language model service.
Groq and the ChatGroq Class
Groq provides access to high-performance language models. The ChatGroq class is a specialized interface for communicating with Groq’s LLM service. It ensures that the correct model (e.g., various versions of LLaMA) is used to generate responses and that it is optimized to work with Groq’s hardware infrastructure.
LangChain and Its Components
LangChain is a framework that simplifies building applications with language models. In this design, it manages the conversation workflow by the following ways:
Linking the language model with prompt templates and memory via the LLMChain.
Structuring prompts through components like ChatPromptTemplate, HumanMessagePromptTemplate, and MessagesPlaceholder, which format the conversation and include historical context.
Maintaining conversation context with ConversationBufferWindowMemory so that each new response is informed by previous interactions.
These components combine to produce dynamic, context-aware responses that enhance the overall user experience.
Running the Autonomous AI Agent Locally
My python file is customagent.py. We run the streamlit based app/agent using the following command
$streamlit run customagent.py
Deploying the Custom Agent on Heroku
Running the app locally helps us to test and troubleshoot. But building and running the app is fun only when we can really make it ‘live.’
My goal is to deploy this agent on Heroku so that it becomes publicly accessible. The deployment process involves setting up dependency and runtime files, configuring the environment with shell scripts, and instructing Heroku how to run our application.

I deployed the agent on Heroku by following these steps:
I started by creating several files in a GitHub repo e.g., CustomAgent.py, requirements.txt, runtime.txt, setup.sh, and Procfile.
Important: The filenames that we create in github (and deploy on Heroku) are case sensitive, e.g., Procfile with P in caps. These files ensure that Heroku installs the necessary dependencies, sets up the proper runtime environment, and starts our application correctly.
Here are the various files explained in greater detail.
Step 1: Requirements and Runtime
Create a requirements.txt file in your GitHub repository that lists all project dependencies. For example, my requirements.txt file contains:
streamlitCreate a runtime.txt file to specify the Python version used by Heroku. For example:
python-3.11.0These files ensure that Heroku installs the correct dependencies and runs our application using the specified Python version.
Step 2: Setup
A Streamlit/Python app on Heroku requires a setup script – a setup.sh file.
The setup.sh file is a small script that automatically configures the environment for our Streamlit application when it runs on Heroku. It performs three key tasks:(1) It creates a dedicated folder (named “.streamlit”) where Streamlit expects to find its configuration files. This is done using the command: mkdir -p ~/.streamlit/ This command ensures that the folder exists, even if it wasn’t there before.
(2) It generates a credentials file (credentials.toml) that stores our Heroku account email. This file helps Streamlit associate the app with your account. The script writes our email into this file so that Heroku and Streamlit know who is responsible for the application.
(3) It creates a configuration file (config.toml) that tells the application how to run. In this file, the app is set to run in “headless” mode (meaning without a graphical interface), it disables CORS (Cross-Origin Resource Sharing) which can affect web security settings, and it dynamically assigns the network port using the value provided by Heroku’s environment (the $PORT variable). This ensures that the app listens on the correct port provided by Heroku for handling web requests.
For example, my setup.sh file contains:
mkdir -p ~/.streamlit/echo “\
[general]\n\
email = \”xyz@example.com\”\n\
” > ~/.streamlit/credentials.tomlecho “\
[server]\n\
headless = true\n\
enableCORS=false\n\
port = $PORT\n\
” > ~/.streamlit/config.toml
We replace the placeholder email with the one registered for our Heroku account.Step 3: Procfile
Heroku uses a Procfile to know which command to run for your web process.
I created a Procfile at the root of your repository containing the following line:
web: sh setup.sh && streamlit run customagent.py –server.port=$PORTThis line tells Heroku to first execute setup.sh to configure the environment, then launch our app on the port specified by the environment variable $PORT.
Step 5: Deploying to Heroku
1.Log into or sign up for our Heroku account.
2.From our Heroku dashboard, we create a new app. I created environment variables in Heroku setting to avoid exposing them publicly or even in GitHub. Note that when deploying on Heroku I did not use the .env to store environment variables. I also installed Papertrail app in Heroku as the logs really help in troubleshooting.
3.Connect our GitHub account and select the public repository containing our Custom agent.
4.Configure the deployment settings and deploy our branch.
Heroku’s GitHub integration automatically redeploys our app when we push updates, making it easy to maintain and update our smart AI app (i.e., autonomous agent).
In my work here, I used some shortcuts – or rather, ‘fastcuts’ .
Instead of creating the files locally and then pushing to a GitHub branch, I simply created a GitHub repository and then created all files online and directly in the main branch itself.
Instead of using the Heroku CLI, I created an app directly in the Heroku dashboard. I then went to the Deploy tab in my Heroku app and connected my GitHub repo and enabled automatic deploy. Then I pressed deploy and voila my app got deployed on Heroku.
For purely personal/demo work, I find this “pipeline” very convenient. If I make any change in any file in my connected GitHub repo, Heroku automatically picks it up and deploys the change.
I can watch the deployment live in the Activity tab of the Heroku app.
In multi-developer real-life projects, it is good to consider using Heroku Pipelines (https://devcenter.heroku.com/articles/pipelines), so we have a maintainable deployment pipeline for our app.
Final Thoughts
I created this application from scratch using Python libraries. The integration of the various libraries creates an application (i.e., an Autonomous AI Agent) that combines a user-friendly interface (Streamlit) with secure configuration (dotenv/os), near real-time language processing (Groq), and a structured conversation management framework (LangChain).
The building of this custom agent has been a learning experience from many perspectives.
While in theory, building our own AI agent promises a lot of flexibility, an AI project can soon start to become complex as we start incorporating MLOps/DevOPs, testing, monitoring, logging and security, RAG, and integrations into our autonomous AI agent.
In the next article I have examined how a multi-agent system can simplify our projects. Please see the post: Developing an Autonomous Multi-Agent System (MAS) Using Python and Salesforce Agentforce
Caution
This is a simple demo project for my personal testing. It does not have any relationship to any real-world apps and should not be taken as a template for any production implementation.
752 total views, 2 today